☰ Table of Contents
- Complete Guide
- Table of Contents
- Introduction
- Welcome to iScreensaver
- Downloading and Installing
- Designing and Preparing
- Preferences
- Managing Projects
- Importing Media
- Editing a Screensaver
- Branding Control Panels
- Customizing Installers
- Building Installers
- Distributing Installers
- QuickStart and Sample Projects
- Installing a Screensaver
- Troubleshoot
Locking and Unlocking Content
Ultimate License Only.
A screensaver can contain two completely different presentations. Which sequence plays depends on the "locking" status of the screensaver. As the screensaver author, you can control the locking behavior of the screensaver, and generate individual keycodes to unlock the screensaver. For example, a common use for this is to provide a "teaser" or "demo" version of a screensaver that is unlocked for a while, then locks after a few days. You would then sell unlocking codes on your website through the online merchant of your choice.
//marketing intermission//
The Locking features are advanced enough to require our Ultimate iScreensaver License, but they come with the incredible advantage of being able to market or sell upgraded screensavers to your existing users with their own personalized keycodes. For our unregistered customers, don't forget - try it before you buy it!
We think you'll love it.
//end marketing intermission//
Using the Locking tab
You can test all locking features without purchasing the software. However, until an Ultimate license is purchased, all "unlocked" sequences will be watermarked. The Locking tab allows editing of the locking behavior: set the initial state, set time- and use-based changes. Edit the type of unlocking codes provided, and set a URL hyperlinks for customers to find your website. And, of course, you can edit the content of the unlocked sequence.
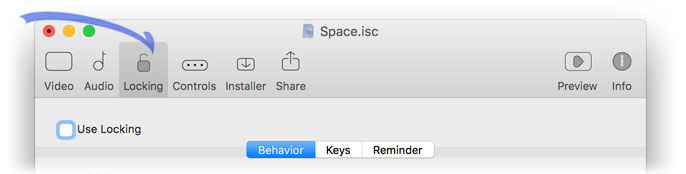
But first you have to turn it on.
To enable the locking features:
- From the Project window, do one of the following:
- In the toolbar, choose the Locking icon.
- Select Locking > Locking Settings from the Project menu. - Click the Use Locking checkbox.
The toolbar transforms to show two separate Video and Audio sequences, and the Locking subtab edit panes are now available. Any sequence in the project at the time of enabling locking will be considered Sequence 1 and remain on the left side of the toolbar.
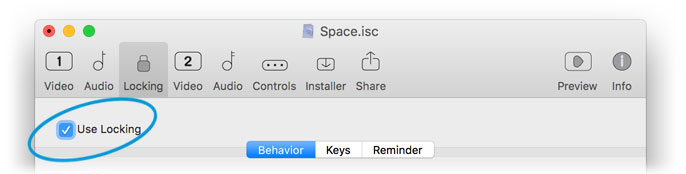
If locking is ever disabled in a project (either accidentally or on purpose), Sequence 1 will become the main sequence, and while the Sequence 2 data will remain a part of the project, none of it will be built into the installers. Re-enabling Locking will restore the separate sequences to the project.
Tip:
- Want the locked sequence to be the unlocked one instead? Just select all items from one sequence, copy, and paste them into the other sequence. Check the Global Settings to make sure the sequence settings are the same.
Using the Behavior subtab
When using Locking features, a screensaver is in either one of two states: Sequence 1 or Sequence 2. This status controls which audio/video presentation the user will see. The behavior subtab is where you control the switching behaviors. It's very flexible : you can have the screensaver start on either sequence, and change on a certain date, or after a certain number of uses or hours of runtime. Do you want the user to see the unlocked presentation first, or not until they've paid? Do you even wish for them to know about it at all? It's your choice when to drop the drawbridge of commerce.
Defaults are Initial State: Sequence 1, Reminders: On, and No Automatic Change in Behavior.
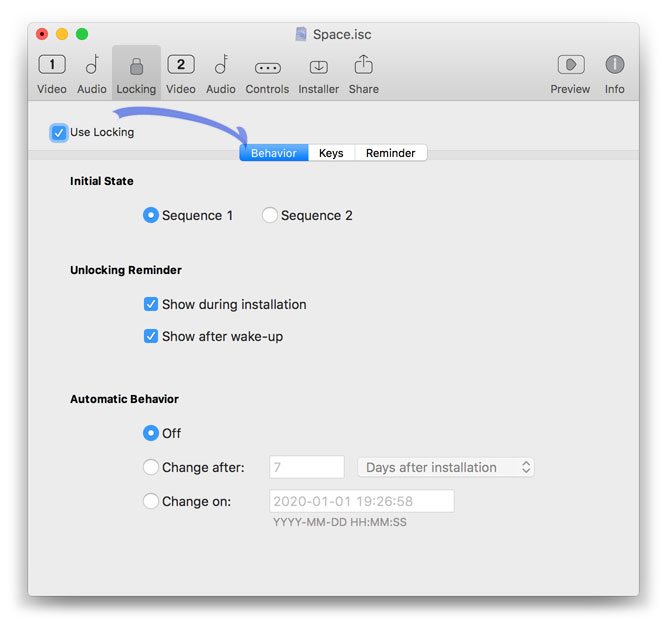
Initial State
Determines the sequences used for previewing and installing. Sequence 1 is on the left side of the Locking icon, while Sequence 2 is on the right side. Whichever sequence is chosen is what the end user will first see when previewing or installing the screensaver.
Unlocking Reminder
The Reminder dialog can be disabled from alerting the user to the alternate content. Without this reminder, the only indication of further content is the Lock icon in the Control Panel. Clicking the Lock icon opens the Unlocking Reminder dialog.
Show during installation
Before installation begins, the user can be notified that there is extra content.
Show after wake-up
Each time the screensaver wakes from sleep, the Reminder dialog alerts the user of extra content. The user can postpone the reminder for another time in the future.
Behavior
The screensaver can switch from one sequence to the other automatically:
No Change
It stays as it lays. Fairly self-explanatory - the screensaver will never switch from its initial state on its own. Note that if the user enters an unlocking code, this will change the state.
Change After : Hours of Use
Switches after a pre-determined amount of hours used. These hours are tallied during normal operation of the screensaver, and do not include previewing during installation, nor testing from the Control Panel.
Change After : Uses
Switches after a pre-determined number of uses. These uses are tallied during normal operation of the screensaver, by actually triggering the screensaver via hot corners or system timeouts, and do not include previewing during installation, nor testing from the Control panels.
Change After : Days After Installation
Switches at a pre-determined number of days after the user first installs the screensaver.
Change On: Date and Time
Switches on a specific moment in time. Use an ISO date-time string in the following format: 'YYYY-MM-DDD HH:MM:SS'. This is determined by the local date and time on the end user's machine.
Tips:
- Not all settings make sense so take care to test before deploying.
- The locking status will never change while the screensaver is running. Any changes will not take effect until the screensaver is exited, then will show on the next use.
- "Uses": Depending on the operating system, when security settings are enabled, every time you mis-type the password it will re-start the screensaver. Thus, a person could quickly 'use up' 4 uses if they typed their password incorrectly 4 times.
- "Hours of Use" : remember that many computers have energy saver settings in use. Others do not. Thus, 10 hours of use could last one user a week, and another user could go through that in a single night.
- "Date": this is a date/time local to the user's computer timezone.
Using the Keys subtab
When an end-user's screensaver is locked, they should have a way to unlock it again. This is what a unlocking key (also called "Keycode") is used for. As the author, you can provide these keycodes for free, or sell them, or provide them as a reward for some other consumer behavior. It's your choice.
There are two types of key codes: a Key List and a Key Generator. The Key List is simpler: just generate a short (or long) list of passwords. Every password will unlock the screensaver. There is no "username" required. The Key Generator provides an algorithm so you can generate unique user/password combinations after distribution has begun. However, the type of key code must be chosen when built, prior to distribution.
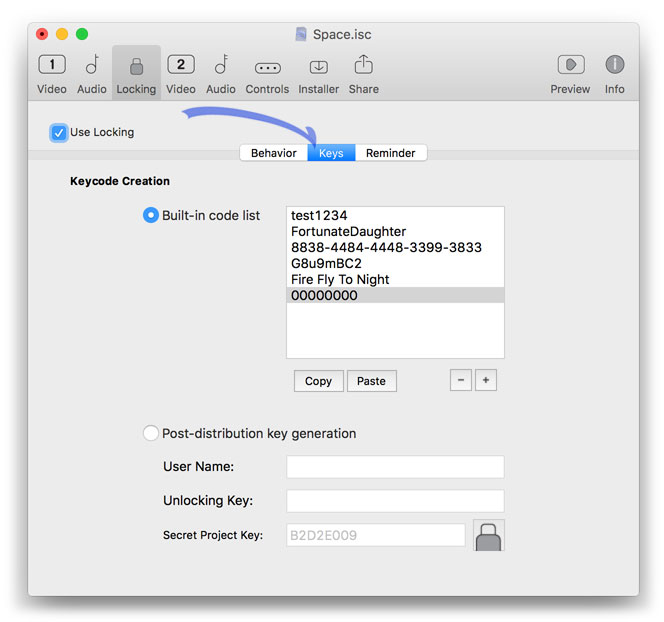
Built-in code list
A series of keycode words, phrases, codes, or numbers, that are built into the installer. These codes are present in the screensaver file, but are encrypted and hashed for security. Add them one at a time, or import through a standard text file list. You can also copy/paste from Excel or a text document.
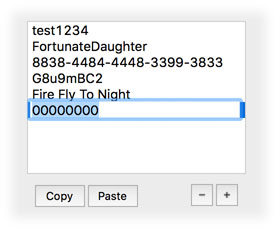
The Copy button
Copies all selected keycodes to the clipboard. Then paste into a third party text editor.
The Paste button
Pastes from the clipboard to the list.
The Delete - button
Remove selected keycodes from the list.
The Add + button
Add a new keycode to the list.
Tips:
- Remember that the keycode list in the screensaver at the time it was built is what matters. Changing the keycode list after a user downloads your screensaver won't do a thing for the copy they downloaded earlier.
- Imported keycode lists should have line breaks between each item. Leading and trailing spaces will be removed.
- If you add and remove keycodes, then rebuild your installers before distributing them.
- Take care not to leave the default '00000000' in the list.
- It's possible to use Unicode text as a keycode, but this may make it harder for users to type the code, so consider using just ASCII letters (A...Z and 0..9) for ease of use.
- iScreensaver.com does not track these user keycodes and cannot re-create them later.
- iScreensaver.com does not provide any merchant services for this feature. You are completely responsible for any financial/legal transactions as a result.
Post-distribution key generation
The other method is to use the built-in key generator. Using this method, the end user must provide BOTH a username AND keycode to unlock the screensaver. The screensaver has a built in code validator that checks the user/password code using a secure algorithm. This algorithm is based on the "Secret Project Key" field. This gives you flexibility : you could issue five different screensavers that all have the same secret project key -- in this case one user/key combination would unlock all five screensavers. Or, you can re-release a new copy of the screensaver after changing the secret key, which would invalidate all prior keycodes.

User Name
To issue an unlocking code using the generator, just type the username into this field. A good choice is the user's email address since this is unique, but you can use another username if you have a website, etc.
Unlocking Key
The keycode will be generated automatically as an encrypted combinatio of the User Name and the Screensaver ID Seed. Simply copy and paste this to an email and send to your user. With they enter the User Name and the Keycode, the screensaver will unlock.
Secret Project Key
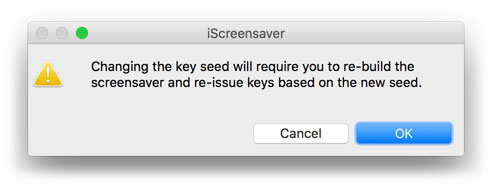
The secret ID code for the project. Usually, it's best to leave it the same seed for the life of the project, however by changing it, new distributions would be immune to previous keycodes. Use the Unlock button to change the secret project key.
The Unlock button
Unlock the Screensaver ID text field with the Unlock button. With a warning...
Tips:
- If you change the Secret Project Key seed after beginning distribution, you will invalidate the prior user/key combinations already issued, for any user that tries to download the new screensaver.
- Keep the Secret Project Key private.
- Remember that the Secret Project Key in the screensaver at the time it was built is what matters. Changing the key after an user downloads your screensaver won't do a thing for the copy they downloaded earlier.
- To issue a new customer code at any time, just re-open the project, and enter the new username. For this reason, keep a copy of both iScreensaver Designer and the project file handy.
- iScreensaver.com does not track these user keycodes and cannot re-create them later.
- iScreensaver.com does not provide any merchant services for this feature. You are completely responsible for any financial/legal transactions as a result.
Using the Reminder subtab
When using the Locking features, think carefully about the information included in this Unlocking Reminder dialog, as this will make an impression on the end-user's decision to visit your website for more information and/or to purchase a keycode.
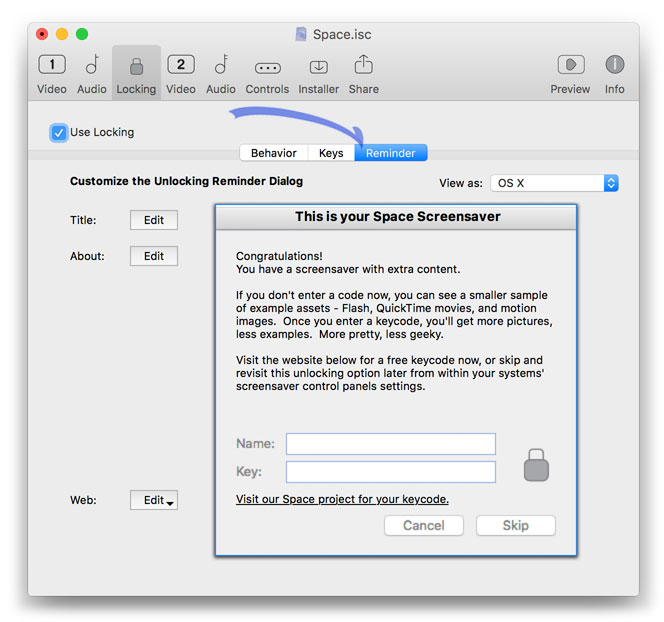
Title
Setting For Windows Only:
Under Windows, this displays as a separate dialog window, thus needs a proper title for the titlebar. On Mac OS X this is displayed as a "sheet" window that has no titlebar.
To set the unlocking window Titlebar:
- Do one of the following:
- On the Customize tab, click the 'Title: Edit' button.
- On the View mockup, click within the Menu Bar area. - Type the unlocking window name.
- Do one of the following:
- Press 'Enter'.
- Click outside the text field.
About
Enter a description for the special content of your screensaver in this text field. Since one aspect of cross-platform application creation is that the system fonts used on the varying platforms do not use exactly the same leading and kerning, please see our examples to view the differences between Windows and Macintosh system fonts.
To set the unlocking description:
- Do one of the following:
- On the Customize tab, click the 'About: Edit' button.
- On the View mockup, click within the About text area. - Type the unlocking information.
- Do one of the following:
- Press 'Enter'.
- Click outside the text field.
Web
Users can click on this link that can take them to whatever web page you'd like them to visit for learning about your keycode arrangements, with the page opening within an external web browser. You do not have to show the URL to your web page, but can have some nice descriptive text instead.
To edit the unlocking website information:
- On the Controls tab, click and hold on 'Web Site: Edit' to access the pop-up menu.
- Do one of the following:
- Click 'Edit Text' to change the description that appears on-screen.
- Click 'Edit URL' to change the URL of the actual page that is opened in the user's external web browser.
- Click 'Test Link' to check the URL in your external web browser.
Understanding Locking Behaviors
You have playing one of two sequences - the locked sequence or the unlocked sequence, called Sequence 1 and 2. Either can be set to start-up upon install, and it is optional to switch to the other after some duration, amount of use, or at a particular time and day. So you can offer your end users a tease to your unlocked content that locks after so much viewing time.
Initial states
As a default, the locked sequence will preview and playback, until a code has been entered for the unlocked sequence. It shall never switch automatically without a code.
User-switched changes
With a keycode, the end user can switch sequences. They can remove the keycode and re-lock the screensaver, if so desired.
Example: your screensaver is promoting a special VIP party and everyone gets the screensaver invite, but a select few receive the mysterious keycode.
Duration-related changes
After a certain amount of time viewing the screensaver, the sequence can switch to the other.
Example: your screensaver is offering a sneak peek at your unlocked content, but after 3 hours of use, it switches to the locked sequence, thus your end user would need a keycode to return.
Date-related changes
At a particular moment, the screensaver switches sequences, based on your user's local time and date.
Example: your screensaver is advertising a movie opening and the screensaver is to switch from a teaser-trailer to the final trailer upon the day of release.
Key Query Moments
There are a few times when the screensaver will ask the end user for their keycode. The user can skip this with no consequence if they are not in possession of the keycode at the time.
During installation
The installer will ask the end user if they would like to enter a keycode during installation. The user can skip entering any keycode at this time.
After use
The screensaver will open its Control Panel and ask the end user after every use. The user can can skip entering any keycode at this time. In addition, they can ask to not be notified again for a time period (from one hour to one month).
After user delay
If the user had selected a reminder delay, and that time has passed, then after the next wakeup it will ask again.
Creating Keys
Keys consist of either a list or a seed generator. Only one method will be used in building an installer.
Key List
Don't be obvious with creating your list of codes. Use unicode if your end user machines will all support different languages, though remember that unicode is difficult to type for many users.
Writing codes
Keep track of any codes that you create within a built installer. In making keycodes, use a system, but not one that could be guessed outright. Be sure to copy out a full list of your available keycodes when building an installer for distribution.
Importing codes
Any carriage-return-separated list can be imported into the Key List, so if you use FileMaker, Microsoft Excel, or a SQL database, that data can be pasted into the Key List.
Key Generation
Use a Secret Project Key seed that cannot easily be guessed.
Advertising Keys
The end user will need to know how to go about finding themselves the special advanced screensaver keys. When they click the lock button in the Control Panel, the Registration panel will pop-up, with space for information about your extra content, web links, and a location to enter their keys.
Code retrieval information
A unicode text field is available to announce your special content and explain how to obtain a screensaver keycode.
Web links
Place the URL to your webpages to obtain further information. There is an option to re-word the link text.
Code entry locations
Your end user will enter their name and key to switch over to the expanded content. The keys are generated on the Key subtab of the project's Locking tab.
Security
How secure is secure? Most able-bodied hackers can find their way into anything. We protect what is possible, but no security is absolutely foolproof. It just cannot be honestly promised by any software company. The keycode protection in iScreensaver should be considered "lightweight" security -- it is intended to discourage theft for the casual user, but will certainly not stand up to a determined hacker.