☰ Table of Contents
- Complete Guide
- Table of Contents
- Introduction
- Welcome to iScreensaver
- Downloading and Installing
- Designing and Preparing
- Preferences
- Managing Projects
- Importing Media
- Editing a Screensaver
- Branding Control Panels
- Customizing Installers
- Building Installers
- Distributing Installers
- QuickStart and Sample Projects
- Installing a Screensaver
- Troubleshoot
Importing Media
Use the Video and Audio tabs to import your media assets in your project sequences. There are a variety of simple ways to move the files into the project, and once there, there are plenty of resequencing options and editable settings. Edit changes made within iScreensaver do not affect the asset files on disk.
Using the Video tab
For most screensavers, this is where the magic happens. Anything appearing on-screen in iScreensaver is considered a 'video asset' whether movie file, .GLB 3D object, or still image. Just about any graphical file format that the standard OS will read in their Media Players can be imported.
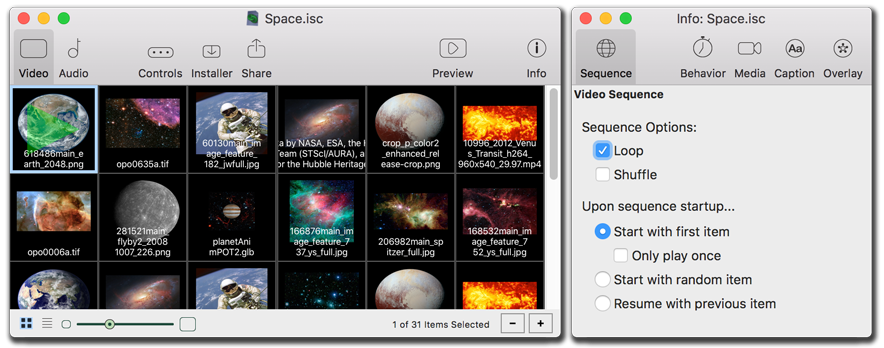
The Sequence area
All video items are shown, in linear order (from left to right, top to bottom).
The Thumbnail / List toggle buttons
Switch between a graphical Thumbnail View or detailed List View of all video items.
The Zoom slider
In Thumbnail view, adjusts thumbnail size. In List view, adjusts the height of each row.
The Selection Information section
Details the number of assets selected. Also shows progress information when importing large numbers of assets.
The Delete button
Remove selected sequence items from the project.
The Add button
Allows use of the Open browser to import files.
The List View columns
Detailed information about all video items in the project.
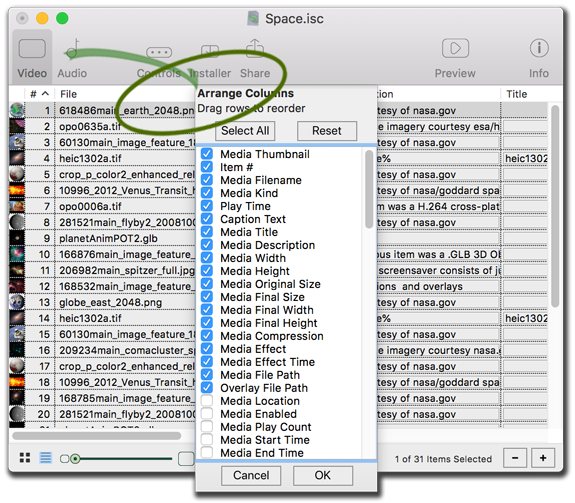
Control-click in the List View column name area to re-arrange columns.
Tips:
- Resize the widths of the List View columns with the column dividers.
- Change the row height by adjusting the width of the thumbnail column.
- See more about the asset files in List View by control-clicking on the columns. Toggle desired parameters, and drag parameters in the list to re-order columns.
- Column limit: only 63 columns can be shown at once.
- Use the keyboard Delete key to remove an item from the sequence. This will not remove the asset from the hard drive.
- Overlay images are imported on the Overlay tab in the Info palette, not from within the Video tab. This is covered in the next chapter.
- If preparing a screensaver for others, don't use DRM (Digital Rights Managed) movies or audio files; these will not work on anyone else's computer.
- Only use assets you have permission to use.
Importing Video assets
You can import a single file, multiple files, or even a folder. When importing a folder, all sub-folders will be included. Files will only be imported if they are the proper video format. Use software such as Apple's QuickTime Player to prepare movies in the HTML5 cross-platform H.264 compression format. Any H.264 movies, 3D objects (.GLB, using GLTF 2.0 binaries), and image files can be imported at the same time.
To import video assets:
- Do one of the following:
- From the desktop, drag the files into the Video tab's Sequencing area.
- Click the [+] button on the Project window, and select with the Open File browser window.
The assets will be automatically added as new items in the Sequence area.
Tips:
- Some media file formats require that third party decoders be installed on both the author's computer and on the end-user's computer. If this has occurred, think about converting the items to proper cross-platform standards.
- On Windows OS, you can only select a single file in the File Open browser. To import multiple assets, drag-and-drop from Windows Explorer instead, or select a Folder containing multiple assets.
- When importing a folder containing many items (more than 100), all items will be scanned, and you will be given a chance to confirm or cancel. HIt the ESC key to cancel the scanning process.
Importing GLTF 2.0 (GLB) : GL Transmission Format Binary assets
iScreensaver supports display of 3D scenes and models packaged as GL Transmission Format (GLTF, version 2.0) Binary format (known as GLB/.glb): See GLTF 2.0. Working knowledge of a 3d application, such as the Open Source program Blender, is recommended.Models
3D models can be used as either the main Media layer or as an Overlay. Within Designer, models can be positioned in 3D space, rotated, and given rotational or linear movement.Tips:
- For best performance, minimize the number of vertices/faces in the model.
- Models are displayed as viewed through a single, static Perspective camera.
- Import of Cameras and lights (other than emissive materials) is not supported in iScreensaver.
Materials
iScreensaver supports a subset of PBR materials properties: diffuse colors and roughness, and emissive materials.Tips:
- iScreensaver illuminates models using a single ambient (white) light.
- Environment images, transparency, metallicity, anisotropy, and sheen are not currently supported.
Textures
iScreensaver can display texture-mapped objects (e.g. diffuse and normal maps).Tip:
- For best results, scale all textures to POT ("power of two" size in each dimension), e.g. make sure the width and height of the image are one of these exact pixel sizes: 64, 128, 256, 512, 1024 or 2048. Non-power-of-two sizes, or sizes above 2048 in either dimension, or the use of highly detailed normal maps may impair performance.
Animations
iScreensaver supports keyframed animation with location, scale and rotation transform, and models animated via bone-based armatures with keyframed location, scale, or rotation transforms. Physics-based animations are not supported.Tip:
- If a Model has multiple animations, all animations will be played simultaneously, so if you only want certain animations, you should disable or remove un-wanted animations before exporting the GLB file.
Importing Live Photos to make a Screensaver
iScreensaver version 6.3 or later will automatically import LivePhotos
To import Live Photos [macOS 10.13, 10.14, or 10.15 with iScreensaver 6.3 or later] :
- In Apple's Photos.app, select desired Live Photos images,
- Drag and drop thes selected items directly into iScreensaver Designer Sequence Editor window
- [Alternatively, you can copy from Photos.app and Paste into Designer, which has the same results]
- Designer will scan your photos library. Be sure to grant it permissions if the OS asks for it.
- For each LivePhoto found, one image (either JPEG or HEIC) and one video (MOV) file will be imported
To import Live Photos [on macOS 10.12, or when using iScreensaver 6.2 or earlier] :
- In Apple's Photos.app, select desired Live Photos images, press and hold the Option key, and drag the images to the Finder Desktop or desired folder. The small red number badge shown during the drop will show double your selected images.
The .JPG and .MOV assets will be created in your dropped location. These JPG and MOV files are now ready for importing into iScreensaver Designer. - Do one of the following:
- From your dropped location, drag the .MOV files into the Video tab's Sequence editor.
- Click the [+] button on the Project window, and select with the Open File browser window.
The .MOV assets will be automatically added as new items in the Sequence area.
To import Live Photos on Windows :
For more information, also see Apple.com: Import Photos- Using macOS Photos
- Connect your iOS device to your Mac.
- Import your photos into the Photos application.
- Select the Live Photo you wish to export.
- Use File > Export > Export Unmodified Original to export to your file system.
- Using macOS Image Capture
- Connect your iOS device to your Mac.
- Select the Live Photo you wish to import from your device to your local file system.
- Choose the destination folder and click on Import.
- Using Windows 10 File Explorer
- See also Apple.com: Import Photos
- Ensure that iTunes for Windows is installed. You can download it from here: http://www.apple.com/itunes/download/
- Open File Explorer. This can be opened by pressing the Windows Key and E at the same time.
- Connect your iOS device to your PC.
- You should see your iOS device in the "This PC" folder.
- Navigate to the following folder: (your device) > Internal Storage > DCIM and look for the Live Photo you wish to import.
- Your Live Photo will be stored as a pair of files: a JPG file and a MOV file.
- Drag the pair of files to your local file system.
Live Photos Tips:
- For that Floating Memory feeling, select all, and change the Dissolve duration to 2 seconds.
- Some Live Photos' movies are much shorter than 3 seconds, use the project's List View to sort by clip length to decide upon the shortest you want to support.
- Audio from the video clips will also dissolve up and down. Authors can preset the user's volume levels either by-asset or overall upon installation.
Importing Panorama photos
The easy creation of very large and very beautiful panorama photos are one of the new advantages of modern phones. iScreensaver can automatically discover most sizes of panoprama images upon importing. Adjustments can be made to duration, starting location, and spin velocities during Preview.
To import Panoramic photos:
- Do one of the following:
- From the desktop, drag the files into the Video tab's Sequencing area.
- Click the [+] button on the Project window, and select with the Open File browser window.
- On the Mac, from Photos.app, drag the panoramas into the Video tab's Sequencing area.
The assets will be automatically added as new items in the Sequence area.
Play length can be adjusted on the Behavior : Play tab of the Info palette.
Motion effects can be adjusted on the Media : Effect tab of the Info palette.
Tips:
- 360 Spherical and 240 Cylindrical panoramas have specific Motion Effect presets that will be automatically chosen. The velocity directions can be modified for both kinds.
- Most camera panoramas that stitch from a long slow sideways crawl are Cylindrical panoramas.
- The default Cylindrical Panorama Motion Effect spins to the left, with a Y rotation of 0, and Y spin of -3, but if a right-starting spin is required, set Y rotation to -150, and Y spin to +3.
- If a panorama runs off the edge of the screen early, reduce the default 40 second Play time length on the Behavior tab of the Info palette.
Deleting Video Items
Sometimes an asset just doesn't work out.
To delete video item(s):
- In the Video tab, select any items(s) to be deleted.
- Do one of the following:
- Press the 'Delete' key.
- Click the - button in the Project window.
- From the Edit menu, choose 'Delete'
- Right-click the item, and from the Edit menu, choose 'Delete'
The items will be removed from the Sequence. The media files on disk will not be affected.
Sequencing Video Items
Video items can be rearranged within the Sequence when using either Thumbnail View or List View. Use standard selection keyboard short-cuts to choose multiple and non-contiguous assets. Items will play back in the order shown. However, if the sequence has the global "Shuffle" setting enabled, then the order will be randomized during playback.
To change the order of video assets:
- In the Video tab, select any files to be moved by doing one of the following:
- Click to select a single item.
- Shift-click to select a contiguous set of items.
- On Macintosh, command-click to select non-contiguous items.
- On Windows, control-click to select non-contiguous items. - Drag the items to the new location within the Sequence area.
The items will then move into the new order.
Tips:
- In Thumb view, the actual sequence order is always as shown, even if shuffle is active.
- In List view, the actual order is only accurate when you are sorted by the first column (the Item #). If you are sorting by a different column, then the current order will be the temporary sort order. To change the sort order in list view, click the 'Item #' column so that you are sorting by item number before re-ordering items.
Using the Audio tab
For most screensavers, this is where the aural magic happens. Music tracks can be set up to loop, shuffle, or simply play just once.
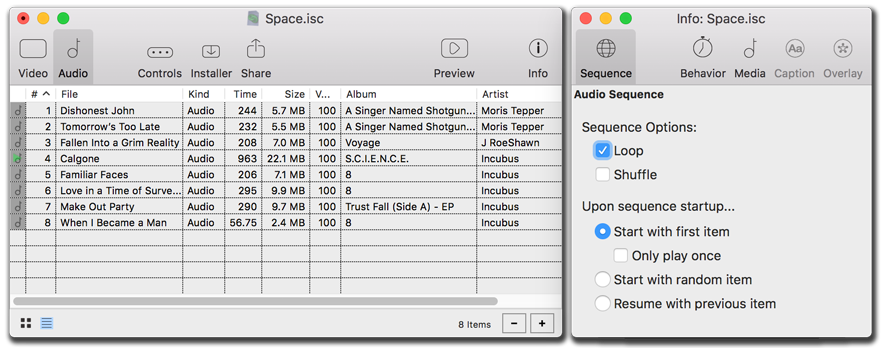
The Sequence area
All audio assets presented in linear order from top to bottom.
The Selection Information section
Details the amount of assets selected.
The Delete button
Remove selected sequence items from the project.
The Add button
Allows use of the Open browser to import files.
The Audio columns
Detailed information about all audio assets in the project.
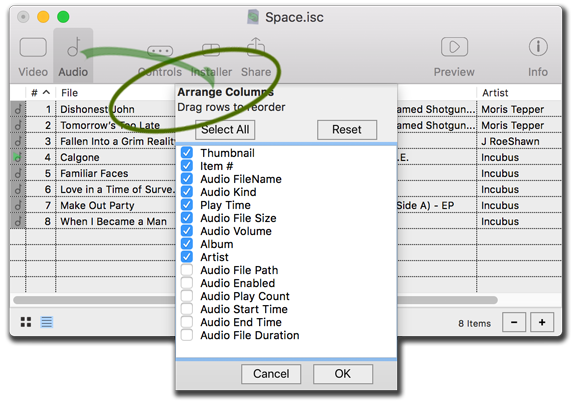
Control-click in the List View column name area to re-arrange columns.
Tips:
- Resize the widths of the List View columns with the column dividers.
- Resize the height of the List View columns by widening the thumbnail column.
- See more about the asset files in List View by control-clicking on the columns. Toggle desired parameters, and drag parameters in the list to re-order.
- Use the keyboard Delete key to remove an item from the sequence. This will not remove the asset from the hard drive, only from being listed in the project.
- Beware of Digital Rights' Management surprises: just because an audio file can play locally does not mean that it can play (or play legally) on everyone else's machines. Make sure not to use unlicensed or rights-managed tracks.
- Only use audio you have permission to use.
Importing Audio
Whether a single file or a collection of folders, everything can be brought into iScreensaver, and it will sort out the proper audio formats.
To import audio assets:
- Do one of the following:
- From the desktop, drag the files into the Audio tab's Sequencing area.
- Click + from the Project window, and select with the Open browser.
The assets will be automatically arranged in the Sequence area.
Deleting Audio
Sometimes an asset just doesn't work out.
To delete audio assets:
- In the Audio tab, select any files to be deleted.
- Do one of the following:
- Type Delete.
- Click - from the Project window.
The assets will be removed from the Sequence area. The media files on disk will not be affected.
Reorganizing Audio Sequences
Any audio asset can be rearranged within the Sequence. Use standard selection keyboard short-cuts to choose multiple and non-contiguous assets. If using 'Shuffle' features, assets do not need to be arranged in any particular order.
To reorganize audio assets:
- In the Audio tab, select any files to be moved by doing one of the following:
- Click for single assets.
- Shift-click for contiguous assets.
- On Macintosh, command-click for non-contiguous assets.
- On Windows, control-click for non-contiguous assets. - Drag the assets to their desired location within the Sequence area.
The assets will then move into their new order.
Using the 'Add Items...' browsers
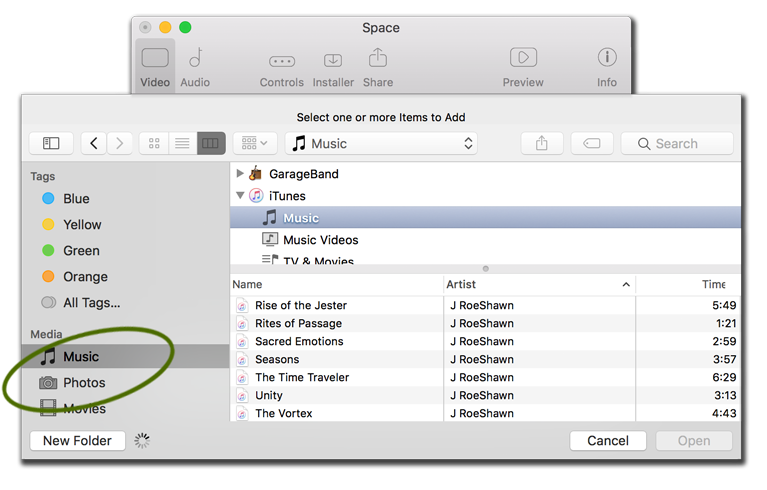
Both Mac and Windows operating systems have new file selection dialogs that provide shortcuts to find all Movie, Music, and Picture files. On Mac, selections can also be made directly from Photos and iTunes playlists.
Macintosh
Use the "Music", "Photos", or "Movies" from the Media section. Within each is an iTunes and Photos sub-selection that will include Playlists and Photo Albums.
Windows
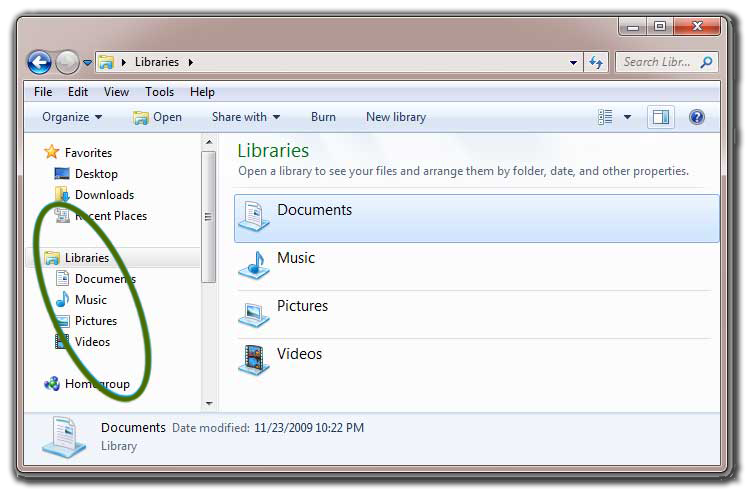
Use the "Documents", "Music", "Pictures", or "Video" library folders to choose from your personal assets.
