Image Size
Using iScreensaver with Large Images
In digital imaging, some people think "the more pixels the better." While this may be true for print media, there are actually cases where having too many pixels can cause problems in your screensaver.
Here are some hints and tips to consider.
Problems with large images
Using source images that are too large can cause problems:
- Crashes or malfunctions
- Slow performance
- Degraded visual quality
- Large file sizes
General Design Goals:
- QuickTime and iScreensaver have a maximum image size of 4096 pixels (either width or height). While iScreensaver can resize images during the build process, for best results, use source images smaller than this size.
- OpenGL graphics cards often have limits that are significantly lower. For example, older cards often max out at 1024 pixels maximum width or height. Fortunately, iScreensaver will automatically reduce the size of the image during playback. Unfortunately, this reduction process can slow down performance.
- Don't use more pixels than the screen: the largest monitor you'll likely encounter (30" pro displays) have a pixel size of 2560x1600. Thus, if you are using an image that is wider or taller than this, you are basically wasting pixels since the image will be re-sampled at this smaller size anyway. In fact, the vast majority of computers are using 1680x1050 or smaller monitors
- Some OpenGL cards, when presented with large images, will automatically go into S3 Texture Compression mode, which reduces image quality. It may seem counter-intuitive, but providing a Larger image size may actually result in Lower image quality.
- Larger size images will perform more slowly. Remember that if you increase the image width and height by 2, you are increasing the size by a factor of 4 (2x2) and the overall performance may be 75% lower.
- Larger size images are, well, larger. Remember that if you increase the image width and height by 2, you are increasing the file size by a factor of 4 and the final file size may be 4x as large.
Specific Recommendations:
- Reduce all images to a maximum of 4096 pixels width or height before importing into iScreensaver.
- Inside iScreensaver, use image compression to reduce image sizes to a size appropriate for the target screensaver.
- Modern computers: 2048x2048 maximum, with JPEG level 4 or 5, is a good compromise.
- Older computers (built before 2008 or those with cheap graphics cards): 1024x1024 maximum size, with JPEG level 5 or 6.
- When building, watch the build log for warnings & errors. Look at final file sizes to be sure you don't have any outliers.
- What resolution monitors are commonly in use? Common OSs and Monitor Sizes
How To: Reduce image size using iPhoto
(Only do this if you are stuck with image sizes greater than 4096 pixels)
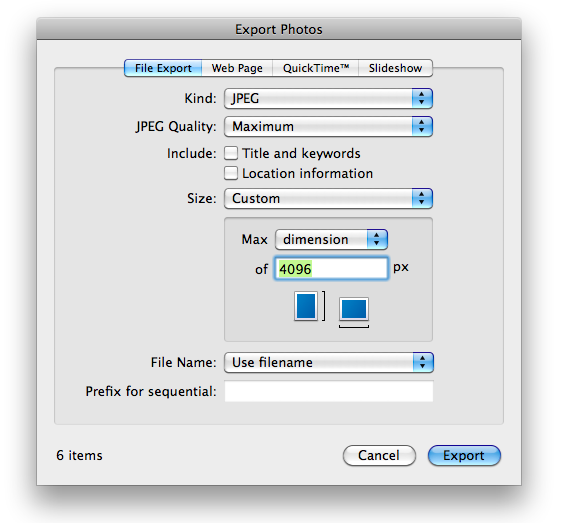
If your source images are too big (more than 4096 pixels width or height) and you don't have any way to start with lower size images, then you may just want to use the brute-force approach and reduce them using iPhoto. If your images are 4096 pixels or less, you don't need to do this...
- Create an album of the image files you wish to use.
- From the FIle Menu, choose "Export" and use the settings shown.
- Find the exported images, and drag these files into your iScreensaver project.
- Note: one downside of this technique is that you'll lose meta information (Title, Description) in iPhoto. So if you can, it's better to use another method.

