☰ Table of Contents
- Complete Guide
- Table of Contents
- Introduction
- Welcome to iScreensaver
- Downloading and Installing
- Designing and Preparing
- Preferences
- Managing Projects
- Importing Media
- Editing a Screensaver
- Branding Control Panels
- Customizing Installers
- Building Installers
- Distributing Installers
- QuickStart and Sample Projects
- Installing a Screensaver
- Troubleshoot
Distributing your Screensaver Installer
Once you have built a screensaver, you will need to get it to others for testing and/or distribution to your end users, customers, or clients.Managed Installation | Windows | macOS | Security | Email | Website | DVD and others...
Managed Installation
Note: If you or your IT department are installing screensavers on multiple computers, please follow our Managed Installation Instructions.Building for Windows
iScreensaver 6 and later builds a single-file EXE installer which is very simple to use. After building, just transfer the EXE file to others and they can double click it to install the screensaver. Then can even test or preview the screensaver from the EXE without installing.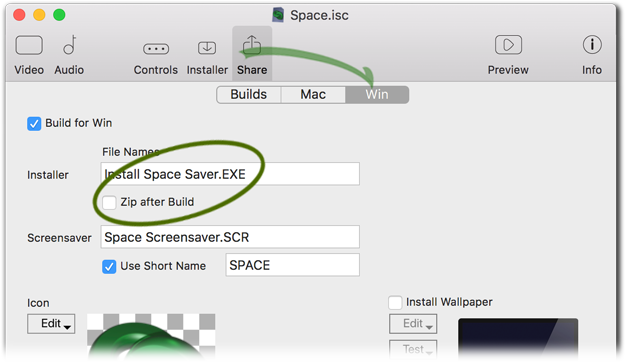
Hint: When building, be sure to leave the 'Zip afer Build' option OFF for Windows screensavers.
Building for macOS
iScreensaver 6 and later builds a single mac .app package which is very simple to use. This .app file is automatically .zipped to a single file for ease of use. After building, just transfer the ZIP file to others and they can double click it to unzip the file, and double-click the App to install the screensaver. Then can even test or preview the screensaver from the App without installing.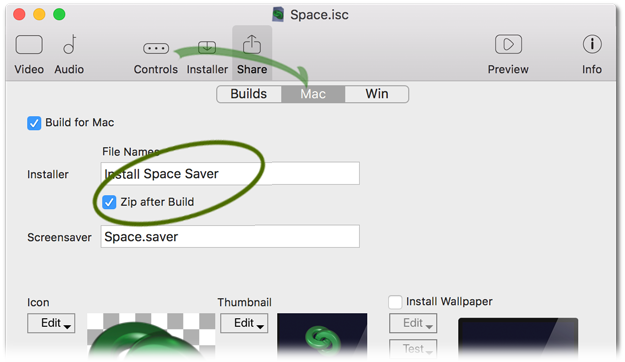
Hint: When building, be sure to leave the 'Zip afer Build' option ON for macOS screensavers.
Security Issues
A screensaver is software, and when you build a custom screensaver you are creating custom software. Modern computers are cautious about running new and unknown software, and it's likely that your end users will see warnings when they first try to run the software. Please see our Code-Signing, Gatekeeper and Authenticode instructions for hints and tips.- Apple: Sending a large attachment using iCloud and MailDrop
- Google: Sending a large attachment using Gmail and Google Drive
Website Download
Delivering your iScreensaver via website download
This is the best way to distribute your screensavers. No physical object to be manufactured and you can update the files as needed. Things you will need include:
- A place to Host your web page.
- A way to Upload your screensaver Installer to your web page.
- A Link on your web page to the downloadable files.
Hosting your web page
Most ISPs (Internet Service Providers -- the people that you pay to access the Internet via Cable Modem, DSL, Fiber, or Wireless) provide homepage service along with your account, for example, here is a great ISP:Uploading the Installers
The most common ways are HTTPS upload and SFTP upload. Check with your Host or ISP for details.Creating Web Links
Finally, you will need to create a link on your web page that, when clicked, will automatically download the Installer program. If you are not a HTML code programmer, check with your ISP, the w3schools training site, or the w3.org for hints and techniques for setting up your website.Other distribution Methods
Delivering on CD-rom/DVD-roms
If you have built a screensaver and are trying to make it available via CD or DVD, these instructions should be useful. Please note that this is a rather technical process using some archaic knowledge of hybrid disc formats, and may require third party software. Most modern computers do not even arrive with a media drive at all anymore. For these reasons, we can not provide further technical support for this process. We recommend the simpler, and more versatile web-based distribution, if at all possible.
Creating Windows-format CDs or DVDs from a Windows computer
If you are using Windows, follow these steps:
- Build your screensaver, and locate the new Installer file.
- Insert a blank CD-R (or DVD-R) into your machine.
- Copy the single-file installer ("My Screensaver.EXE") to the disc.
- Burn the disc and eject it.
- Test the disc on another machine : Insert the disc, open the disc icon, and double-click the EXE file to start the installer.
Creating Macintosh-format CDs or DVDs from a Macintosh computer
If you are using macOS, follow these steps:
- Build your screensaver, and locate the new Installer file.
- If you have built it on a Windows machine, copy the .ZIP file to a Macintosh, and un-zip it by double-clicking it.
- Insert a blank CD-R (or DVD-R) into your machine.
- Copy the screensaver Installer file ("Install 'My' Screensaver.app") to the disc.
- Burn the disc and eject it.
- Test the disc on another machine : Insert the disc, open the disc icon, and double-click the installer file to start the installer.
Creating Hybrid discs: Basic Method (Requires macOS)
macOS can now burn cross-platform discs that will work in both Mac and Windows PCs. These steps provide a simple way of accomplishing this task. If you need more control over the finished CD or DVD, or if you are on a Windows-only PC, read the Advanced Method below.
- Build your screensaver installers.
- If you built the Macintosh saver on a Windows PC, it will be in ".zip" format. Copy this file to a Macintosh, double-click it to unzip the file, leaving you with a normal mac app file (e.g. "Install 'My' Screensaver.app") .
- Insert a blank CD-R (or DVD-R).
- Copy the installer files to the disc. Remember that the single-file Windows installer will end in ".EXE". The Mac installer will end in ".app". You may want to put them in separate "Windows" and "Macintosh" folders to avoid confusion for the end user. If you aren't seeing the filename extensions, then do this: Go to the Finder, choose "Preferences" from the Finder menu, and make sure "Show All Filename Extensiosn" is checked.
- Burn the disc and eject it.
- Test the disc on both a Macintosh computer and a Windows PC : Insert the disc, open the disc icon, and double-click the proper installer file (the .app one for Macintosh, the .exe one for Windows) to start the installer.
Creating Hybrid discs: Advanced Method (Either platform)
- Build your screensaver installers.
- Obtain CD/DVD Mastering software:
For Macintosh, we recommend Roxio's Toast.
For Windows, we recommend CDEveryWhere or MacDisk for Windows. - Create a hybrid disc that contains both a Mac and Windows partition. Here are some sample instructions that may assist:
- On macOS X, instructions using Toast (6.0.5 or greater).
- On Mac OS 9, instructions using Toast.
- On Mac OS 9, instructions using Toast (example #2).
- On Windows, instructions using MacImage.
- On Windows, instructions using CDEveryWhere.
- Simplify installation for your end users:
For Windows, following instructions can set an "AutoRun" or "AutoStart" feature to automatically start the screensaver installer when the disc is inserted.
For Macintosh, this feature has been disabled as of macOS for security reasons. However following instructions, the window can automatically open instead.