☰ Table of Contents
- Complete Guide
- Table of Contents
- Introduction
- Welcome to iScreensaver
- Downloading and Installing
- Designing and Preparing
- Preferences
- Managing Projects
- Importing Media
- Editing a Screensaver
- Branding Control Panels
- Customizing Installers
- Building Installers
- Distributing Installers
- QuickStart and Sample Projects
- Installing a Screensaver
- Troubleshoot
Branding Control Panels
To 'brand' a screensaver is to create value and uniqueness through the human psychological symbolic construct of positive experience with the product.
In other words, make it yours, but make it good.
Using the Controls tab
The Controls tab allows you to give your screensaver some personality - a name, a graphic image, some descriptive text, and a website that users can click on to reach your site. Plus it customizes all the features of the users' Control Panel in a 'What-You-See-Is-What-You-Get' format. Switch between the 'Options', 'Screens', and 'Info' tabs to adjust all the initial settings. Change the 'View as :' to see how your screensaver control panel will look under Macintosh and Windows operating systems.
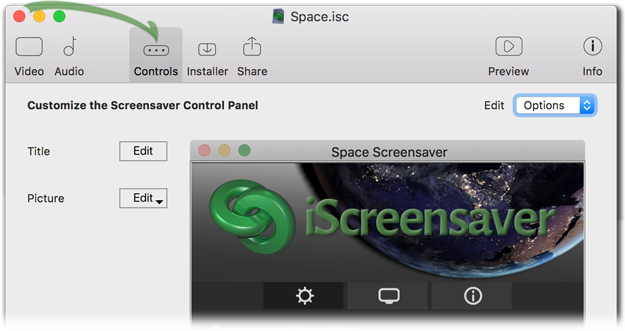
Title
The screensaver name, that appears as both a selectable screensaver in the lists found in macOS's System Preferences or Window's Control Panels and as the title of the screensaver options' controls dialog, is set here. This is not the same name as the Installers or Saver/SCR files (those are set on the Share tab).
To set the screensaver name:
- Do one of the following:
- On the Controls tab, click the 'Title: Edit' button.
- On the View mockup, click within the Menu Bar area. - Type the screensaver name.
- Do one of the following:
- Press 'Enter'.
- Click outside the text field.
Picture
This is the control panel picture for your screensaver. It is recommended to create your splash screen at 784x240 pixels, and to save it using the PNG format, though any standard OS still image format will also work. If you use a file that is a different size, it will be proportionally resized to fit to 784x240 pixels and converted to PNG file format.
Some ask, why 784x240 pixels? We say, as the breadth of two oxen led to the width both of rails and of roads, the historical After Dark splash screens were always set at 392x120 and, at least for our world, for now, that's honorable enough for us. However, we're living in a retina-screen world, so doubled the old resolution.
To set the screensaver splash screen picture:
- Do one of the following:
- On the Controls tab, click the 'Picture: Edit' button and choose a picture file from the File browser.
- From the desktop, drag and drop a picture file into the View mockup's splash screen area.
Editing the Options tab
The author can set the initial user setting regarding the on-screen display controls, and the other settings are available to the end user after installation.
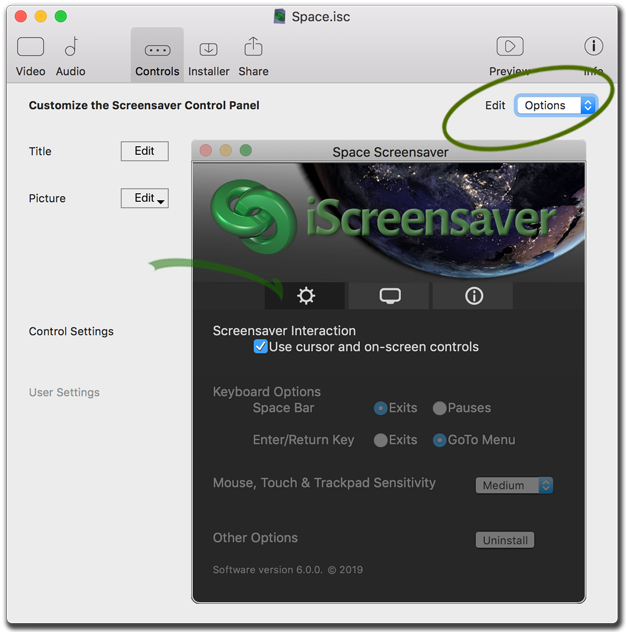
Screensaver Interaction
Allows some use of on-screen playback controls by the user during Sleep Mode, however requires the screensaver to ignore other mouse movements. These controls include audio mute, play controls, and jumping to any other asset. Default is unchecked, not showing the on-screen controls.
Keyboard Options
If cursors are available, then the end user can use the keyboard's left and right arrow keys to move between assets in the sequence. Also, the keyboard's spacebar can exit or to set to pause playback and freeze motion effects, and the 'Return' key can exit or open the Go-To item selection menu.
Mouse, Touch & Trackpad Sensitivity
If cursors are available, then the end user can use the mouse, screen, or trackpad to sweep in small motions to instantly exit screensaver playback.
Editing the Screens tab
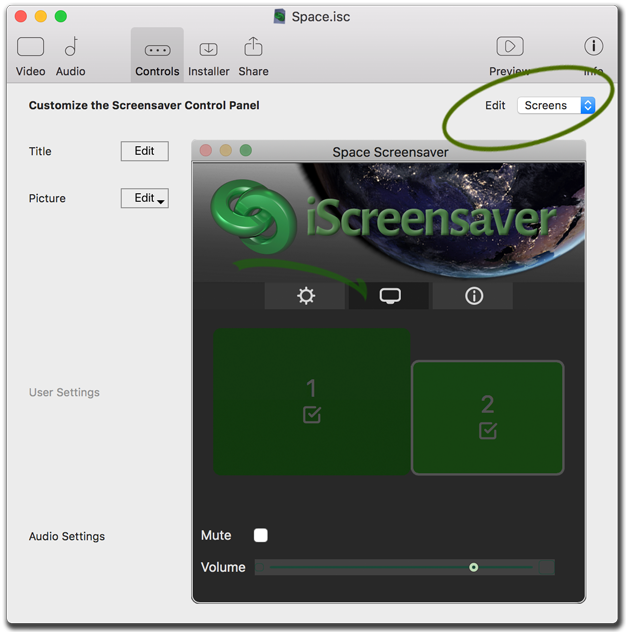
Screen Selection
The user can enable which screens will be used for screensaver playback. Dis-enabled screens will go black. This area will display individual computer's potential displays.
Mute
Only necessary for screensavers that have audio. This can also be toggled from the on-screen display controls with the volume slider.
Volume
For screensavers with audio, this control slides to the left for quiet and the right for loud, and can be set even without audio content being present. Volume only adjusts the screensaver audio in relation to system volume settings, thus if the system volume is off, then so will be the screensaver volume. Authors can pre-set the suggested volume for end users.
Editing the Info tab
This contains the first level of support information that your end user may possibly see, so best foot forward. Unregistered users of the iScreensaver software can edit this text, but the default text will always be displayed alongside any edited text until software purchase and registration.
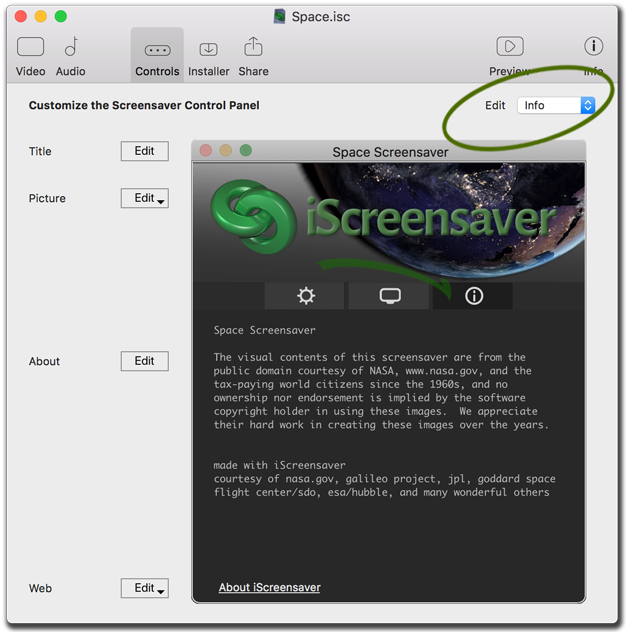
About
Enter a description of the content of your screensaver in this text field. Since one aspect of cross-platform application creation is that the system fonts used on the varying platforms do not use exactly the same leading and kerning, please see our examples to view the differences between Windows and Macintosh system fonts.
To set the screensaver description:
- Do one of the following:
- On the Controls tab, click the 'About: Edit' button.
- On the View mockup, click within the About text area. - Type the screensaver name.
- Do one of the following:
- Press 'Enter'.
- Click outside the text field.
Web
Users can click on this link that can take them to whatever web page you'd like them to visit, with the page opening within an external web browser. You do not have to show the URL to your web page, but can have some nice descriptive text instead.
To edit the website information:
- On the Controls tab, click and hold on 'Web Site: Edit' to access the pop-up menu.
- Do one of the following:
- Click 'Edit Text' to change the description that appears on-screen.
- Click 'Edit URL' to change the https:// URL of the actual page that is opened in the user's external web browser.
- Click 'Test Link' to check the URL in your external web browser.